This is part 2 of the replacement procedure for the M30 headgasket. Part 1 introduced you to some of the new parts required in a head gasket replacement. Part 2 covers the actual removal of the cylinder head.
Drain coolant
Drain the coolant by either removing the coolant drain plug from the radiator (slow) or removing the bottom hose (messy).
Run the engine for about 3 minutes to put some heat in the head. This helps to prevent it from warping when you take it off. Beware, running the engine will pump more coolant out so if you’re using a drain pan don’t move it yet.
Put the car where you want it
Switch off the engine. You should have the car in the right place to do the job now, as it won’t be moving (without help) for at least the next 11 hours. You need to remove lots of things from around the engine before you can lift the head.
Air filter
Unclip the spring clips from around the top of the filter housing. Pull the inlet pipe off the top housing and leave it attached to the car. Put aside the top housing and the filter. Loosen the single bolt at the side of the lower housing, loosen the large hose clip holding the flexible hose to it, and remove the housing.
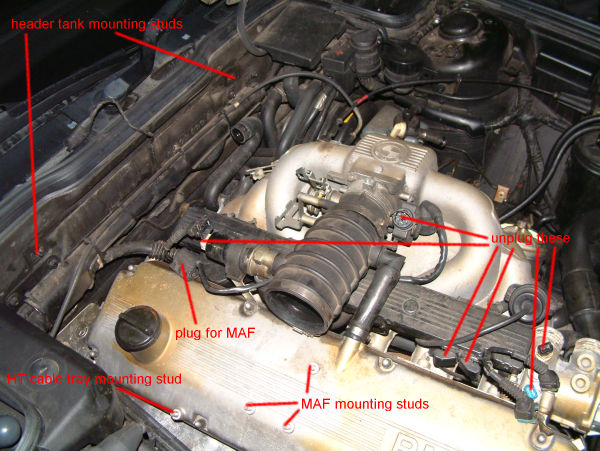
MAF (Mass Air Flow sensor)
Unplug the electrical cable from the side of the MAF. Using a spanner undo the three nuts holding the MAF to the rocker cover. Loosen the large hose clip on the other side of the MAF, and put the MAF to one side.
Coolant expansion tank
Undo the 2 plastic nuts holding the tank to the bulkhead. Loosen the clip on the large hose and pull off the hose. Undo one of the small hoses and move the tank to one side, still attached by the other hose, or just remove both.
Throttle butterfly
Remove the top plastic cover, held in place with a single bolt. Unplug the throttle angle sensor. Unclip the throttle cables from the butterfly. Undo the two bolts holding the throttle cable mounting plate to the inlet manifold. Move the mounting plate to one side.
Inlet pipe
There is only one bit of inlet pipe left now, attached to the throttle butterfly. Loosen the hose clip on it and pull it off the throttle, then unplug the vacuum hoses from it and remove it.
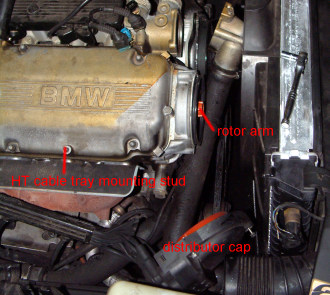
Distributor and HT leads
Undo the 3 bolts holding the distributor cap to the front of the engine. Undo the 2 nuts holding the HT lead channel to the rocker cover. Unplug all of the spark plugs. Unplug the lead which goes to the coil. Unplug the two sensor cables from the other cabling channel on the rocker cover - one of them goes to a pickup on one of the spark plug leads. The distributor cap and cables can now be removed.
Rotor arm
Undo the three bolts holding the rotor arm in place, and remove it, along with the black plastic tray behind it.
Exhaust
Jack the side of the car up and support it on a jack stand. Working underneath the car, undo the four nuts holding the two downpipes to the exhaust manifold. Be careful you don’t loose the four springs.
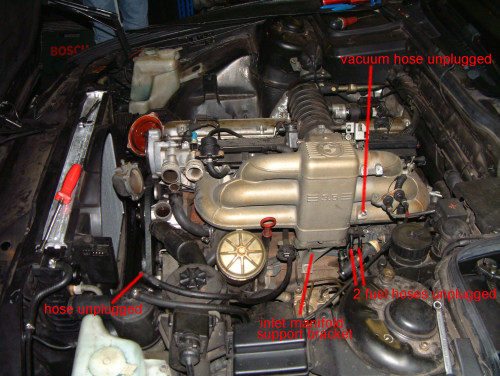
Inlet manifold support bracket
This is held in place with 3 bolts. Remove them and the bracket.
Hoses
You will need to unplug the following hoses:
- 2 fuel hoses from inlet manifold
- various vacuum hoses from inlet manifold
- 2 heater pipes from underneath inlet manifold - these are held in two plastic clips under the manifold
- short hose from water pump
- radiator top hose
Time for a cup of tea!