Symptoms
When the blind is retracted it makes a horrible grinding noise for about 10 seconds
Diagnosis
It seems that the electronic control unit for the rear blind simply applies power to the motor for a set period of time. When the blind reaches the end of its travel it is supposed to stall the motor until the control unit switches off the power.
When the rear blind gearbox was disassembled it was discovered that the main gear had several stripped teeth, with the blind in the closed position. This meant that rather than stalling, the motor continued turning, causing the worn gears to make a loud clicking noise.
The gearbox for the rear blind contains a powerful spring. Make sure you understand what is involved before you undertake this job. The description that follows worked for me, I don’t guarantee that it will work for you.
The main gear wheel is only used over approximately 120 degrees, which means that there is scope for rotating it so that a good section of teeth is used. The problem that needs to be addressed is that there is a screw in the side of the gearbox which acts as a stop, and makes sure the gear only turns 120 degrees. The gear needs to be modified before the stop will fit in any other position other than the one it was designed for.
You will need
- Socket set
- screwdrivers
- a small drill with a grinding bit
- a tap & die set
- selection of small machine screws
- a hacksaw and a file
- Allen keys
Procedure
Remove the two trim pieces either side of the rear window. To do this, first pry out the interior lights, using a flat screwdriver behind the rear edge. Next put your hand in the hole and pull gently but firmly away from the car body. You need to pull the top away first, then the bottom will pull up. You might need to ease it past the trim around the door opening.
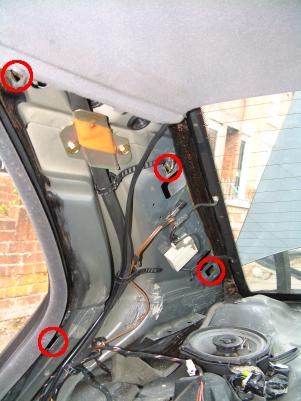
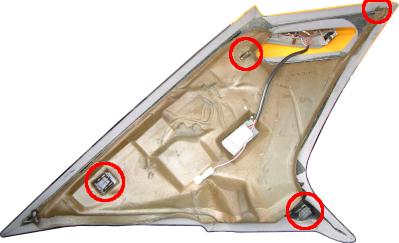
Pop out the 4 plastic clips on the front edge of the parcel shelf, unplug it from the car (a 4-way plug on the right hand side, near the right speaker), and carefully pull it forwards and out of the car.
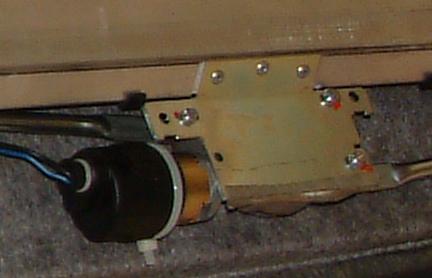
Put it down somewhere upside down and examine the mechanism. You should find an electrical control unit, connected to a small motor and gearbox. The output shaft of the gearbox is connected to a plate which has two arms connected to it, one for each actuating arm for the blind. When the shaft rotates the arms are pulled towards each other, which raises the blind, or are pushed away from each other to lower it.

Unplug the motor from the control unit. Cut through any cable ties securing the wire to the shelf. At the far end of each arm, pry off the one-way washer holding it to the actuating arm.
Mark the position of the 3 screws on the rear of the motor mounting plate and remove the screws. The gearbox can be removed from the shelf with the arms still connected, the longer one has to be carefully threaded out.
Turn the motor over and unscrew the centre screw from the actuating arm wheel. Pry off the wheel.
Before you attempt to unscrew the gearbox, beware. There is quite a powerful spring behind the main gear, to assist it in raising the blind. The tension in the spring needs to be relieved before the gear can be removed. For absolute safety this can be done before you unscrew the gearbox, although with a little care it is possible to do it after opening the gearbox.
Method 1 unscrew the stop screw from the end of the gearbox casing. You’ll need an allen key for this. Now apply 12v to the motor. You want the shaft to turn clockwise as you look at it. Assuming your blind started out closed, you want to turn the shaft about 1 turn. That is enough to take most of the energy out of the spring.
Method 2 also continuation of Method 1. Make sure the stop screw is removed as above. Remove the 3 screws and carefully pry off the top plate of the gearbox. Put a spanner on the end shaft of the main gear and turn it anticlockwise slightly to stop it bearing against the smaller gear. While holding it in that position, pull out the smaller gear. Then carefully unwind the spring by rotating the gear clockwise.
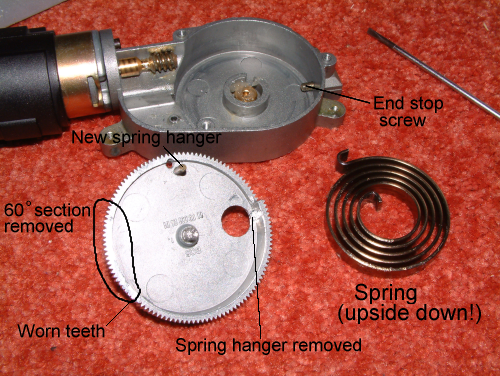
Pull out the large gear and rescue the spring from underneath. Clean all the grease off them so you know what you’re looking at. Run something down the gap between each pair of teeth on the gear to clean it out. You will find a section of teeth has all but gone, this is the section causing all the noise. You need to arrange things so that this section is never used.
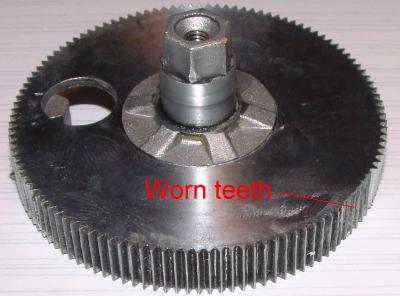
Note the output shaft of the gear. It has a hex end on it, so each face is at a 60 degree angle to the next. Because we want the output wheel to start and end in the same relative position as before, we need to use a section of gear which is a multiple of 60 degrees away from the section it was originally using. See diagram.
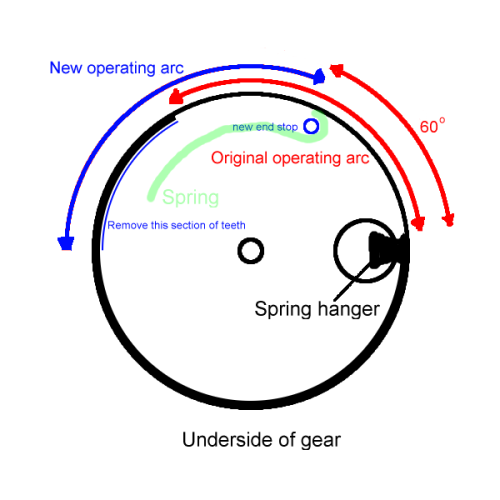
Note the thickness of the edge of the gear. There is a thin section where the end stop screw runs. It goes from the point where the spring hooks on, to a point approximately 120 degrees further round. This thin area has to be extended by 60 degrees. Clamp the gear in a vice and remove a section with a hacksaw, then clean up the edge with a file.
 The point where the spring hooks on also has to be moved 60 degrees round the
gear, and the old mounting hook has to be removed. I removed it with a cutting
bit in my mini drill.
The point where the spring hooks on also has to be moved 60 degrees round the
gear, and the old mounting hook has to be removed. I removed it with a cutting
bit in my mini drill.
The new mounting point can be created by drilling and tapping a small hole in the gear, then driving a machine screw through the hole to form a peg for the spring. Remember, this peg is also the end stop, and you will probably find that the end stop screw in the gearbox casing is not long enough to reach it. You will need to replace the end stop screw with a slightly longer one. NB the other hole near the new spring hanger, in the picture, was an earlier attempt at a different fix method. You can ignore it.
Put a bit of grease on the spring and replace it back behind the gear, in the same orientation as it came out (shown in the diagram in green). NB it is upside down in the picture, with respect to the orientation of the gear. The diagram is correct. Put a bit more grease around the teeth of the gear, align it with the gearbox and replace it, remember the centre of the spring has to line up with the centre spring hanger.
Put two marks on the spindle, each pointing to one of the end stops. When the gearbox is reassembled you will need to power it round about 1 turn so that the spring tensions up and the end stop screw ends up between the two marks. So, make sure the end stop screw isn’t installed yet.
Grease up the smaller gear and replace it. Put on the cover and screw it down.
Put a spanner on the spindle to help turn it. Remember it normally has the weight of the blind helping it turn. You need to turn it anticlockwise to tighten the spring, so apply 12v with the right polarity (trial and error!), and help it turn with the spanner (remember you’ve still got a section of bad teeth in there). When it has turned round enough so that the end stop screw is between the two marks, stop the motor, replace the screw, then apply the power again, while still helping with the spanner, and drive it all the way to the end stop. Now drive it back again to make sure the other end stop is OK. At this point I realised I needed a longer end stop screw because it couldn’t reach the new end stop. Keep testing but always remember to help it with the spanner when it is turning against the spring.
When you are happy, drive it anticlockwise to the end stop then back it off about 10 degrees. Replace the wheel with the two actuating arms on it and tighten the centre screw. Thread the long arm back into the parcel shelf and re-locate the two ends of the arms. The fact that you backed off the motor a bit will help you here as you can potentially raise the blind slightly by hand to get the ends to line up.
Replace the 3 screws holding the gearbox to the parcel shelf, in the same positions as you marked when you removed them. The reason they allow movement from side to side is to equalise each side of the blind so that it extends straight.
Flip the parcel shelf over so it’s the right way up and apply power to the motor. If all is well it will extend completely, if your power supply is a bit feeble you might have to help it like I did (remember your car battery can kick out loads of amps, a wall wart power supply is considerably weaker).
Now drive it closed again and hopefully you will get silence when it is closed completely. Even my feeble wall wart power supply was enough to close it and make a racket before I did the fix, after it was done it was completely silent.
Assuming you are happy with the state of affairs, replace the two one-way washers on the actuating arms, plug the motor back into the control box, and secure the cable with a cable tie.
Refit the parcel shelf into the car. At the rear edge of the parcel shelf are 4 metal clips, these sit in holes near the rear window and used to rattle in my car. On examining the holes I saw that one of them had felt tape stuck around the top, the others were bare metal. I made some more tape with some black material and some double-sided sticky tape, and applied it around the other three holes. No more rattle.
Seat replacement is the reverse of removal.
I will see how long the repair lasts. I’m not expecting 10 years out of it, but it has at least delayed the point where I have to order a new motor from the dealer.
Disclaimer
It is your car, not mine. If you break it, it is your fault, not mine. The gearbox contains a powerful spring!
Update 6th August 2007: a reader emailed me to report that he was able to successfully repair the blind in his E31 with this procedure, although he said that the spring was tensioned the other way round in the E31.